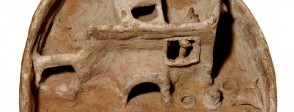
Show the class the image of the terracotta soul house and ask them to identify the following:
• enclosure wall
• courtyard
• roof terrace
• air vent
• porch
• window with stone grille
• water cistern
• storage jar
• grindstone
• loaves of bread
• jar of beer
• cuts of meat
Then show them the image of the town house model in For the classroom and ask them to compare the two homes. Which is the country house and which the town house? How can they tell? What is the same? What is different?
Look at images of a simple town house and a nobleman’s villa in the links in About the object. Ask the students to compare the two. Are there any similarities? What are the main differences? Then, show them the wall paintings in For the classroom of craftsmen, nobility and servants using furniture. Which type of home would each group have lived in? Do they think it would be better to be a working person living in your own modest home or a servant working in a grand house? Finally, show them the furniture in A bigger picture and ask them to decide which house each item might have come from.
The following activities explore aspects of Egyptian homes and furnishings. Use the resources in For the classroom and the hundreds of images available on the British Museum website and the internet to broaden the enquiry. Each activity involves initial research leading on to creative activities.
Ask groups of students to research different types of ancient Egyptian homes and make drawings or printouts to share with the class. Then, working individually with modelling clay, have them make models of Egyptian houses. When dry, these can be displayed with the drawings to create a diorama of a village.
Print out some images of ancient Egyptians from different walks of life. Ask students to choose one each and imagine that person’s home – what it looked like, how many rooms it had, who lived there, how it was decorated, what furnishings it had – and write a description.
Give groups images of Egyptian furniture and a home store catalogue. Ask them to cut out pictures of the modern equivalents of these items, for example, beds, stools and chairs, cushions/beanbags, tables and stands, storage jars and baskets, headrests/pillows, sheets and blankets, boxes/storage units, chests/wardrobes, water jar/shower, toilet/toilet stool, lampstand/table lamp. Ask them to share their findings with the class and discuss which ones they think are better – would they rather sleep on a pillow or a headrest?
Watch the video and slideshow on brickmaking with the class, explaining each stage. Then allow them to make mud bricks, following the instructions in For the classroom. Bricks can be shaped by hand or in a mould made from a sturdy box. When they are dry, students may like to try building a small wall, using mud for bonding. You may be able to invite a bricklayer to come and give a demonstration of bricklaying and explain the different methods. This activity can also be linked to the Bible story of the Israelites making bricks in Egypt – experiment with making bricks without straw to understand why this was a problem for them.
Show the class the images of ancient Egyptian furniture in A bigger picture. Point out how Egyptian carpenters used small pieces of wood to make structures that were light and strong at the same time. Ask groups to test these construction principles by making model furniture models out of straws. Which form is stronger – a square or a triangle? Why make a stool or table with only three legs? See which group has created the strongest model by testing them against each other: whose will support the greatest weight?
Use a grid to demonstrate how the Egyptians created the geometrical designs used to decorate walls and ceilings. Explore simple patterns based on squares and circles and allow students to experiment with these. You could go on to show more complex patterns involving spirals and key patterns. Have groups research what colours the Egyptians used and what they were made from. Students can then use these to inform themselves when colouring their designs.