This is an interesting object to build up slowly so that is the approach taken by the first three activities which would work well in sequence. You can then go on to explore the other objects in the burial and their significance.
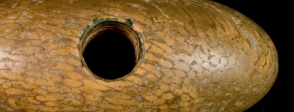
Look at the photo of the mace-head in For the classroom. Ask the students what they think it is and what it is made of. Ask them what features suggest it is made by humans – the smoothness may be one aspect and certainly the hole through the middle. Discuss whether they think it is a complete object and if not what is missing. Why do they think the shaft or handle of the object is missing? Tell them the size of the object and that it would be heavy. Does this change what they think it is?
Now look at the link in For the classroom that shows the head and bone fittings on a replica shaft. Ask whether this fits with what the students had thought and discuss any differences – is the shaft longer or shorter than they had thought? At this point you may want to explain what a mace is. Observe the bone fittings and discuss what they add to the object. Are they practical and if not, why do they think the maker included them?
Finally, look at the photo of the small gold lozenge in For the classroom and tell them that this was also part of the mace. Where on the mace do they think it went and, again, what does it add to the effect?
Show students images of other objects found in the burial from A bigger picture and explain what they are. What do they tell us about the person who was buried there? Was it a man or a woman? Are there clues as to who he was and what he did? Do the students think he lived nearby or perhaps came here from far away to be buried?
Look at the reconstruction painting in For the classroom that shows the man and his mace and regalia. If he was buried with everything that appears in the image, what is missing from the burial and what materials were these made from? Look at what else has been added to his mace – what does this add to its effect? Which aspects of this picture has the artist made up?
You could do a similar process with the Golden Barrow objects and extend your discussion with the Mold gold cape - see the resources in A bigger picture and For the classroom.
Look at all the gold objects in A bigger picture and For the classroom and how they have been decorated. Students could make replicas of them using different materials such as air-drying clay and gold foil. Sometimes the gold sheet covers an object made of shale with the same decorative pattern. Students could try this by making and decorating a clay object then covering it in gold foil.
Give groups of students hard copies of the objects and captions in A bigger picture and For the classroom. Give them this list of materials and ask them to match them to the objects. Discuss whether and how well each material has survived.
bronze – shiny when new, dark green and dull after it has been in the ground
gold – shiny and yellow
wood
bone – white or cream coloured
stone – brown or grey, sometimes rough, sometimes smooth and polished
jet – black and shiny
amber – orange coloured, sometimes see-through and sometimes cloudy
Do some map work locating the following places connected with the Bush Barrow burial.
Salisbury Plain
Brittany
Ireland
Mold in Wales
Greece
Spain
Great Orme mine in Wales – a source of copper to make bronze
Cornwall – a source of tin to make bronze
Whitby – a source of jet
Baltic Sea – source of amber
Ask the students how they think these materials might have got to Wiltshire.
The Bush Barrow burial is a good starting off point for more enquiries and activities about Stonehenge itself. There are excellent classroom resources on Stonehenge on the English Heritage website.